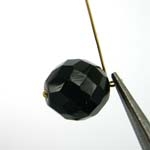
Techniques - Wire Wrapped LoopsTechniques - Wire Wrapped Loops

Go


    Monday-Saturday 9.30am - 4pm
   Shop 3, 284-290 Rocky Point Rd
   Ramsgate 2217
   (entry via Dillon Street)
   ** Dillion Street is now ONE WAY towards Rocky Point Rd**

   02 9529 9982


Wire Wrapping


Wire Wrapped Loops

Tools Required:

Round Nose Pliers
Flat or Chain Nose Pliers
Side Cutters
Bead Mat

wire 0

Tips:

If the bead hole is large, when you finish the loop the wire wrap may slide into the hole; "plug" the hole with a small bead, or use bead caps; this will also help the bead to sit straight.

To save money use the shortest headpin you can. You will need no less than 15mm between the end of the headpin and the last bead.

Keep any scraps of silver or gold wire as they can be sold to metal merchants.

Use the round nose pliers as a guide for how big or small you need your loop to be; we usually grasp the wire about 1.5mm from the tip.

To Start:

Thread the beads required onto the headpin.

Hold the Round Nose Pliers in your weakest hand leaving a gap of 1.5mm between the bead and the Pliers; use a larger gap for base metal or wire thicker than 0.5mm.

In your other hand using either the Flat or Chain Nose Pliers, hold the tail of the Headpin; the Pliers and the headpin should be in a straight line.

Think of the wire as the hands of a clock. When holding the tip of the wire you are starting at 12 o’clock, and are going to wrap the wire around the Round Nose Pliers.

Remember that you are trying to form a neat loop, so don’t be afraid to be firm.

Depending on what feels more comfortable, you can wrap in an anti clockwise or clockwise direction.


Wire 1a

Step 1

Hold the round nose pliers in your weakest hand leaving a gap of 1.5mm between the bead and the pliers; use a larger gap for base metal or wire thicker than 0.5mm.

wire 1

Step 2

Using the tips of your chain nose pliers, grab the wire directly above the beads.

wire 2

Step 3

Wrap the wire around the round nose pliers in the direction of 9 o’clock.

wire 3

Step 4

Moving in a continuous action go to 6 o’clock.

wire 4

Step 5

All the way to 3 o’clock.

wire 5

Step 6

Now you have formed a crossed circle.

AT THIS STAGE DO NOT REMOVE LOOP FROM THE ROUND NOSE PLIERS.

wire 6

Step 7

Turn the round nose pliers to the side so that the tip of the round nose pliers is pointing towards the ceiling.
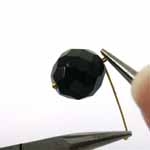
wire 7

Step 8

Continue to wrap the wire around the stalk between the bead and pliers.

wire 8

Step 9

Wrap the wire until there are no gaps, and at least 1 ⅓ times; this will keep beads from spinning if making earrings.
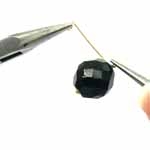
wire 8

Step 10

Finish with the wire facing the same direction as the round nose pliers if possible. (This will make it easier to cut the wire nice and close).


wire 8

Step 11

Trim the tail with the cutters, putting the flat side of the cutters against the loop and at a slight angle.
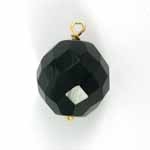
wire 8

Step 12

Your Wire Wrapped Loop is ready to be used. If threading on a shepard keep the cut side to the rear.